In a previous blog we demonstrated the bits and pieces of wood that make up the speeder sweep castings. Once we have the bits and pieces all brad-nailed and glued together, we create fillets (curves) between the ribs and the deck using automotive car body putty. It's a simple matter of squeezing the putty out of the tube and wiping it on the wood, smoothing it out with our finger to create a nice curve. A rubber glove helps to keep the putty off of our fingers. Several coats of body putty, with light sandings in between coats, and soon have nice curved fillets.
The foundryman is not a pattern maker so he needs to know what part of the pattern is the final casting and what part is sand core. In order to help him out, we give the patterns several coats of black and yellow paint - black outlining the final casting and yellow outlining the sand cores. In this way, when he pulls the pattern out of the mold, he knows which sand core goes into which cavity. The yellow outline of the pattern corresponds to a specific sand core.
Here's the top view of our pattern.
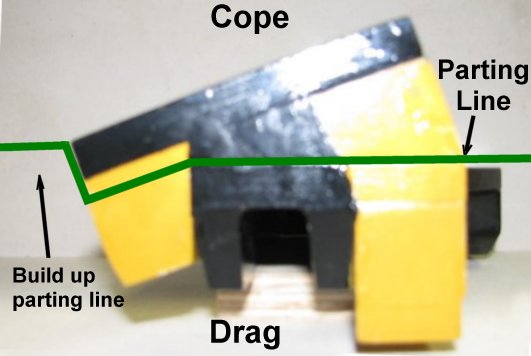
A head-on view. In addition to seeing the profile of the two sand cores that we'll be using, you can readily see that our pattern is in two parts.
You can also see where our parting line will be between the drag and the cope of our flask. What may not be readily evident is a potential undercut on the left side of the photo. When we put the top half of the pattern onto the base, we'll have to get rid of that undercut by building the drag part of our sand mold up before we fit the cope onto the drag.
A side view. Again you can see the top half of the pattern and the bottom half when you look at the wing.
Another side view but with the pattern rotated 180 degrees. You can readily see that our pattern is in two parts.
And a bottom view with the top part of the wing detached from the base. This photo clearly shows the ribs of our casting.
Here's an end view with the two sand cores that will fit into the mold cavity created by the yellow parts of the pattern. Note how the outline of the sand cores corresponds to the yellow outline of the pattern.
Our next step is to make sure that we can make a mold that will accept the sand cores and be ready for the molten aluminum. In effect, this will be a trial run of our mold making to make sure that everything fits together (we hope!).


